Starting over… A testing framework using Selenium
OK, I’ve been quiet for a while. Life has kept me busy, and away from my blog. However, in order for me to continue to retain what I’ve learnt I need to write it down. So why not here?
So I’ve begun rebuilding my automated tests from scratch. Recently begun a course on building a framework using Selenium and my favourite language to code in, C#. Because I like to share what I learn, so others can benefit from it too, I’m going to try to blog about this as much as I can. This post is most likely going to be a bit of an odds n sods post. Jumping all over the place. But I can elaborate further once I’ve got this bunch of thoughts down on “paper”.
First off, why rebuild? Why not just take what you had and make it better?
Here’s why: While I had invested a lot of hours into what I thought would be a great automated test suite. It ended up becoming impossible to manage. Code broke left and right, it was difficult to maintain and even harder to integrate tests for new updates to the web applications I was working with. It became less and less enjoyable to work with and when I don’t enjoy something, I lose all motivation to do that thing anymore. It got easier to switch back to manual testing and stay with that. At least I knew I could follow my own test plans. To add to that, I began researching about automation framework design and architecture recently. This led me to the realisation that I had started out on sort of the right path, but my implementation was lacking and ended up taking a wrong turn which was why I found it such a chore to keep it going. Re-factoring the whole thing would’ve taken as long, if not longer than just starting over and getting it as good as possible from the ground up.
It wasn’t all bad, as I took quite a big chunk of understanding and knowledge from what I had done previously and applied it to my new rebuild. Also, I’d written myself a ton of helper functions to make it much easier to code up tests. So I’ll be revisiting those and using what I can to help me down this new path.
I should add, I had no previous experience in building automated frameworks. I’ve had to learn everything the hard way and teach myself through mistakes, research, trial and error, and just plain old hard work and a lot of hours.
Next up, how did I lay out my new framework?
So, in my previous attempt, I had unknowingly thrown myself into a deep, dark, unexplored pit full of nasty surprises and booby traps that I managed to set off no matter how I attempted to avoid them. My first words of wisdom are these. Build your framework in one project. Create the actual tests in another project. Never build them all in the same project or you’ll find it becomes difficult to find anything, difficult to manage the project as a whole and if you ever wanted to port the framework over to a new web application, well good luck with that.
I’m still a novice when it comes to coding, so I’m going to throw the question out there that I often wondered myself until very recently…
How can i keep them in separate projects and still get my tests to interact with my framework?
Now I know how, it seems stupidly simple and completely logical. It was one of those “AHA” moments. It’s all about references. Making one project talk to another is as simple as adding a reference from one to the other. With this framework, it’s easy to do too, as long as you abide by the waterfall or pyramid rule. Your tests can only talk to your framework and your framework can only talk to Selenium.
It looks something like this:
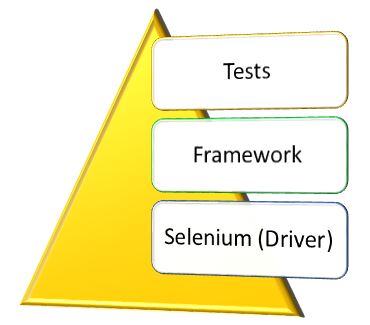
So your tests project needs to reference the framework project. Simple, add a reference to the tests project. In Visual Studio just add a reference and on the references window, click the Projects link and select your framework project. Next do the same with the framework project, add a reference from your framework to use Selenium. You’ll need to install Selenium and the Selenium Support packages from the NuGet Package manager. I’m not covering this here, but will try to make sure I create a post about how to do this specifically at some point down the road. But hopefully you’re already familiar with how to do this.
So now you’ve isolated the the tests project from the Driver, everything you do must follow the rule. This makes life easier for you in the long run because now your tests can’t really break unless the framework is broken.
Creating this framework is going to take way too long and upper management won’t like the time investment without any immediate results. How do I prove it’s worth the time?
So there’s a way I learnt that can help put this worry to rest. In fact, you can throw it into the deep, dark pit where my previous automation attempt is living 🙂 So rather than building the framework up first, build it from the top down. First off, create a test you want to run. Then build the beginnings of your framework based on what that test is going to need. It may end up you need to refactor some of your framework code as you build, but this is easy to do as you build.
I started off by picking one part of the web application I work with and begun to build on that. My first test was a login test. These days everyone needs a login to do anything online. So why not start there. It’s simple to start with and valuable. Since for all my future tests I create, they’re all going to need to login to run. So rather than create a login on every test that would mean writing the same thing repeatedly, make it so that this login test can work for you. Use it in all your tests you need. This way your code stays tidy, and if that login page ever changes, you now only need to update one part of the framework and suddenly all your tests magically work once more.
So how do I build my test if I haven’t got anything in the framework yet?
Easy once you think about it for a moment. Here’s an example, I’ll use the login test for this to explain.
Our imaginary login page has a simple layout. It consists of:
- A username field
- A password field
- A login button
- A reset password link
So in my Test project, i create a new file (I use the Unit test file template for these). Call it something that actually describes your test. So we’ll call it “LoginTests”.
In my LoginTests file, I create my tests I want to perform. So in this case, I want to test that I can simply login to the site and that’s it. We can add to it later, but keep it simple to start.
So my file looks like this:
using System;
using Microsoft.VisualStudio.TestTools.UnitTesting;
using SeleniumAutomationFramework; //this is what i called my framework project

namespace AutomatedTests
{
[TestClass]
public class LoginTests
{
[TestInitialize]
public void Init()
{
Driver.Initialize(); //initializing the web driver (uses a class in my framework, does not init directly from selenium. No references)

}

[TestMethod]
public void User_Can_Login()
{
LoginPage.GoTo();
LoginPage.LoginAs("myusername").WithPassword("mypassword").Login();
}
}
}
So there is my test. I simply created two steps to my login test. Both use my not yet created class in my framework called “LoginPage”. Ignore the “TestInitialize” section for now. I’ll explain why that’s there in another post.
Now you could add more steps such as:
LoginPage.Logout();
LoginPage.ResetMyPassword();
Just come up with test cases you can think of that would be useful to automate and build.
Next you create your class file in the framework to actually put the code in that will allow the tests to work. I’ll add that as another post.
Hopefully this made sense and is actually of use to someone. In future posts I will try to cover more details and provide additional insights as I continue down this new road myself.
