While this site is pretty cluttered with coding info and pages, I’ll add some more fun stuff to this blog too.
So recently I got back into table top games after a long break from playing them. Started off again playing Munchkin and then added Pandemic into the mix. Then I saw Dead of Winter and decided to pick that up. So far I can say i’m not disappointed at all.
Here’s an overview for those who’re not sure what this game is or what it’s about.
You play as a group of survivors, trying to create a place to live, eat and sleep in safety from the impending doom of the zombie apocalypse. So you and your fellow players create a base known as “The Colony”. From here, you will stage all your strategies, feed your survivors and keep the compound clean of waste and refuse. Along with that you’ll need to protect your group, so you’ll barricade the gates to prevent the zombies getting in and kill any zombies that do break in. Sounds easy so far right? But wait, there’s more :). Just when you thought you had everything under control, you’ll be hit with a crisis to resolve each day. This is one of the most nerve wracking parts of the game for me, as it’s one of the ways you may find out if there’s a traitor in your midst, someone working against the group of survivors, someone who wants to see everyone else fail the teams main objective.
Game setup time can take a little bit, but follow the instructions and it’s pretty straight forward.
The game is divided into two phases. The player phase and the colony phase. The player phase can take a good 30 minutes or more to resolve on the first few turns, while everyone gets used to the rules. There’s a lot to do.
The players control their own groups of survivors. Starting off at two, they can add more through card draws, or lose them through death. No one’s ever actually out of the game when they lose their survivors though thankfully. That wouldn’t be much fun to have to sit out for an hour or two.
Each player has a secret objective they must complete in order for them to win the game. This secret set of objectives cannot be revealed to anyone, doing so would ruin the game play. Some of these secret objectives are betrayer cards. These are the ones that turn someone into the villain we all love to hate. The nice guy who you think is backing you up all the way, and will always be there when you need them. Then suddenly, they can’t help. An excuse is given, one you want to believe, but deep down doesn’t seem sincere. You’re torn, do you call them on it, or ignore it and put it down to stress or just a momentary lapse in cognitive skills.
The paranoia that starts sinking in to the players as the game goes on is extremely funny. This was apparent in both games my group and I played. I’ll go into those later though.
The game provides the groups of survivors with a common objective to complete. This can be something simple such as the recommended starter objective (collecting samples of the zombies to find a cure). Or something much more complex that requires multiple objectives to be completed before the goal is fulfilled.
Trying to complete the main objective, whilst also managing your groups secret objective and also handling the days crisis and keeping the colony fed, clean and zombie free isn’t easy. But this is where the game becomes so satisfying and very fulfilling. There’s a lot to do, there’s a lot going on and you really have to work as a team with all the other players in order to get things done that are needed.
On to the Crisis cards. These are what make the game very exciting and intensify the whole experience of the game and the game play. Everyone becomes fixated with the crisis and mistakes are made. Survivors start to die, the colony begins to starve, the zombies start to gather around locations outside of the colony. It suddenly becomes more than a board game. You start to feel the reality. One persons mistake can cause major repercussions across the entire board, spanning all of the groups. So it’s wise to keep the crisis in check. The problem occurs when people you think are helping start to throw in other cards to “contribute” to the current crisis. No one sees what you’re throwing into the crisis pool. And when the crisis resolution phase rolls around, the pool of contributed cards are shuffled and then displayed. This way no one knows who added what. If the wrong types of cards are added, they can cause a crisis to occur rather than be avoided. This is when you know there’s a person with a betrayal secret objective at the table. Watch all the eyes suddenly go wide with horror, shock, surprise, disappointment, anger and finally as each pair of players eyes will then begin to scan the table, everyone suddenly full of suspicion and no longer knowing who they can trust or count on. The plot thickens. Players can vote people out of the colony. Those players are then exiled and have to survive outside of the colony walls.
The groups of survivors all need to search for food, medicine, tools, fuel and weapons in order to continue to survive in this harsh winter at the colony (this includes resolving the current crisis as well as finding stuff to fulfill their own secret objectives and also to keep the colony safe and fed). To do this they must travel outside of the colony’s security and into the surrounding, zombie infested, badlands (does it sound scary? It can get pretty bad out there, believe me). Travelling to a location requires risking your survivors lives. A single dice roll that goes bad and you’ve gotten people killed. This can really cause a chain reaction of bad events. More on that in a bit. Locations are places that hold different types and different numbers of resources based on the location. Such as the grocery store is going to be the best location to find food. The gas station will be the best for finding fuel and the police station will be the best for finding weapons. The problem is, each of these locations will attract zombies when there are survivors at that location. The more survivors there, the more zombies will be attracted. So now the players are forced to ensure they are managing the locations well too. This will involve barricades, killing zombies and also searching for resources.
Survivors can be injured, killed and cause the zombie infection to spread throughout an entire location (effectively killing every other survivor at that location). The survivors must look after each other and keep everyone in good health. Frostbite is one of the worst things that can happen to your survivors. Make sure to fix it quickly.
Once all the players have taken their turns, then the colony phase begins. This is where the group of players will take care of feeding the colony, dealing with starvation effects, resolving the current crisis, managing morale and checking that the waste pile hasn’t gotten out of hand. Crisis resolution is the part that will have everyone tense, wondering, paranoid, you may even start to hear accusations fly. It could even instigate a vote to exile a player on the next day (the new player phase).
All in all, if you want a co-op/defector game and love the zombie apocalypse setting. Then you need this game. Don’t be put off by the learning curve, play through it. Keep playing and you’ll really find everyone gets into it and wants to play again and again.
I was going to post a walk through of my first and second game stories here. But I’ll create a new post for those. Stay tuned.
Introduction: A long time ago…
Star Wars Galaxies (SWG) appeared like a dream come true to a huge number of Star Wars fans who wanted an MMO that would quench their thirst for a game that let players enjoy their favourite world.
SWG was the MMO that we all loved. Then one day Sony ruined it. Some say the Combat Upgrade (CU) ruined it. That didn’t do it any favours, but it wasn’t ruined in my mind. I still loved it and didn’t think the CU was at all bad. The deathblow to the game was the New Game Experience (NGE) or whatever it was called. This well and truly killed the game. For all of us. The exodus away and all the account cancellations pretty much signed the end of times for the game. We weren’t happy.
Then came the genius of a small group who re-engineered the game. Removing Sony’s code and working it back up to the game it was before CU. There are a couple of really good servers out there now. SWG Emu and SWG Awakening are two I would recommend in a heartbeat. They won’t hand you a Jedi. They won’t claim their servers are easy to play on. But they will boast the best communities.
So after playing for a fair while on SWG Emu, i decided to give SWG Awakening a look and see how their systems were different to SWG Emu. Both are fairly similar to be honest. One thing I do know is SWG Emu doesn’t have the syncing issues that seem to plague Awakening (I’ve found myself needing to “soft log” multiple times an hour. This is simply a disconnect/reconnect (not exiting the game fully)).
And here’s where I begin my journey into the world of SWG Awakening…
After setting up my account, I was able to log in and create a new character on SWG Awakening. Some may remember my name from Ahazi, Sau’Rai Luess. While the name stayed the same, my race didn’t. I’m human this time round.
Selected the location to start on (of course I picked Mos Eisley). Then proceeded to check out the local population in town. Was a bit shocked to see there were only about four or five people in the area. Had been hoping for more. I’m sure there’s probably some well visited hubs that are more densely populated (I hope)? I’ll find out sooner or later, hopefully sooner.
So my first day back in Mos Eisley. Actually proved to be a productive one. Stopped in to the cantina and got a free mind buff from a dancer/musician in there by the name of Berami. Armed with my stronger mind, I ran out to grab some missions and start earning some credits. In part so I could actually tip Berami in the near future, also because I needed some new weapons (I started with Scout and just got stuck with the crappy hunting knife. Should start with Marksman or Artisan). So off I ran to find the trainers for Marksman and Brawler. Then off to the bazaar to grab my weapons. These were pretty scarce on the bazaar too. Low tier ones at least. I know new players aren’t the most profitable investment. But to all the weapon smiths out there in the SWG world (on any server), please stop and think about the new players. We can’t afford anything and you try to sell a simple CDEF weapon or the next tier up for far too many credits. I did however find a weapon smith who did sell low tier weaponry. The price was reasonable too it seemed. So I started out buying some of his inventory to get me going. Thanks Ibbi.
I decided to start off with working my way up the rifle tree in Marksman. I’ve never been a rifleman before and thought I’d give it a try this time. My plan is to try every profession in the game this time. It was always a goal I’d had in the past but as with everything, time and reality get in the way. So I’m taking it one profession at a time, not sitting there grinding them out meaninglessly. Although I may resort to macro’s for the Entertainer professions. I’m not sure I can stomach sitting there trying to earn XP for those at the keyboard.
The real goal is to unlock my Jedi again. I cannot lie, when I unlocked it in the original game, the game became so much more fun for me. Even the perma death didn’t deter me. It just made things better. However, there’s no perma death in Awakening. Just massive XP loss as far as I’m aware. So really this blog is about my journey to becoming a Jedi again. Where many have failed, I’m not giving up. I did it once before, I can do it again (in fact I did it twice before. As I had to unlock my wife’s account too, although granted that was a bit easier, since it just meant a lot of time in the Village on Dathomir).
OK, I’ve been quiet for a while. Life has kept me busy, and away from my blog. However, in order for me to continue to retain what I’ve learnt I need to write it down. So why not here?
So I’ve begun rebuilding my automated tests from scratch. Recently begun a course on building a framework using Selenium and my favourite language to code in, C#. Because I like to share what I learn, so others can benefit from it too, I’m going to try to blog about this as much as I can. This post is most likely going to be a bit of an odds n sods post. Jumping all over the place. But I can elaborate further once I’ve got this bunch of thoughts down on “paper”.
First off, why rebuild? Why not just take what you had and make it better?
Here’s why: While I had invested a lot of hours into what I thought would be a great automated test suite. It ended up becoming impossible to manage. Code broke left and right, it was difficult to maintain and even harder to integrate tests for new updates to the web applications I was working with. It became less and less enjoyable to work with and when I don’t enjoy something, I lose all motivation to do that thing anymore. It got easier to switch back to manual testing and stay with that. At least I knew I could follow my own test plans. To add to that, I began researching about automation framework design and architecture recently. This led me to the realisation that I had started out on sort of the right path, but my implementation was lacking and ended up taking a wrong turn which was why I found it such a chore to keep it going. Re-factoring the whole thing would’ve taken as long, if not longer than just starting over and getting it as good as possible from the ground up.
It wasn’t all bad, as I took quite a big chunk of understanding and knowledge from what I had done previously and applied it to my new rebuild. Also, I’d written myself a ton of helper functions to make it much easier to code up tests. So I’ll be revisiting those and using what I can to help me down this new path.
I should add, I had no previous experience in building automated frameworks. I’ve had to learn everything the hard way and teach myself through mistakes, research, trial and error, and just plain old hard work and a lot of hours.
Next up, how did I lay out my new framework?
So, in my previous attempt, I had unknowingly thrown myself into a deep, dark, unexplored pit full of nasty surprises and booby traps that I managed to set off no matter how I attempted to avoid them. My first words of wisdom are these. Build your framework in one project. Create the actual tests in another project. Never build them all in the same project or you’ll find it becomes difficult to find anything, difficult to manage the project as a whole and if you ever wanted to port the framework over to a new web application, well good luck with that.
I’m still a novice when it comes to coding, so I’m going to throw the question out there that I often wondered myself until very recently…
How can i keep them in separate projects and still get my tests to interact with my framework?
Now I know how, it seems stupidly simple and completely logical. It was one of those “AHA” moments. It’s all about references. Making one project talk to another is as simple as adding a reference from one to the other. With this framework, it’s easy to do too, as long as you abide by the waterfall or pyramid rule. Your tests can only talk to your framework and your framework can only talk to Selenium.
It looks something like this:
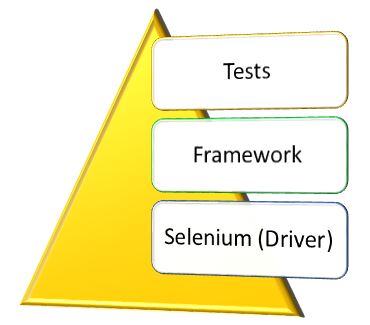
So your tests project needs to reference the framework project. Simple, add a reference to the tests project. In Visual Studio just add a reference and on the references window, click the Projects link and select your framework project. Next do the same with the framework project, add a reference from your framework to use Selenium. You’ll need to install Selenium and the Selenium Support packages from the NuGet Package manager. I’m not covering this here, but will try to make sure I create a post about how to do this specifically at some point down the road. But hopefully you’re already familiar with how to do this.
So now you’ve isolated the the tests project from the Driver, everything you do must follow the rule. This makes life easier for you in the long run because now your tests can’t really break unless the framework is broken.
Creating this framework is going to take way too long and upper management won’t like the time investment without any immediate results. How do I prove it’s worth the time?
So there’s a way I learnt that can help put this worry to rest. In fact, you can throw it into the deep, dark pit where my previous automation attempt is living 🙂 So rather than building the framework up first, build it from the top down. First off, create a test you want to run. Then build the beginnings of your framework based on what that test is going to need. It may end up you need to refactor some of your framework code as you build, but this is easy to do as you build.
I started off by picking one part of the web application I work with and begun to build on that. My first test was a login test. These days everyone needs a login to do anything online. So why not start there. It’s simple to start with and valuable. Since for all my future tests I create, they’re all going to need to login to run. So rather than create a login on every test that would mean writing the same thing repeatedly, make it so that this login test can work for you. Use it in all your tests you need. This way your code stays tidy, and if that login page ever changes, you now only need to update one part of the framework and suddenly all your tests magically work once more.
So how do I build my test if I haven’t got anything in the framework yet?
Easy once you think about it for a moment. Here’s an example, I’ll use the login test for this to explain.
Our imaginary login page has a simple layout. It consists of:
- A username field
- A password field
- A login button
- A reset password link
So in my Test project, i create a new file (I use the Unit test file template for these). Call it something that actually describes your test. So we’ll call it “LoginTests”.
In my LoginTests file, I create my tests I want to perform. So in this case, I want to test that I can simply login to the site and that’s it. We can add to it later, but keep it simple to start.
So my file looks like this:
using System;
using Microsoft.VisualStudio.TestTools.UnitTesting;
using SeleniumAutomationFramework; //this is what i called my framework project

namespace AutomatedTests
{
[TestClass]
public class LoginTests
{
[TestInitialize]
public void Init()
{
Driver.Initialize(); //initializing the web driver (uses a class in my framework, does not init directly from selenium. No references)

}

[TestMethod]
public void User_Can_Login()
{
LoginPage.GoTo();
LoginPage.LoginAs("myusername").WithPassword("mypassword").Login();
}
}
}
So there is my test. I simply created two steps to my login test. Both use my not yet created class in my framework called “LoginPage”. Ignore the “TestInitialize” section for now. I’ll explain why that’s there in another post.
Now you could add more steps such as:
LoginPage.Logout();
LoginPage.ResetMyPassword();
Just come up with test cases you can think of that would be useful to automate and build.
Next you create your class file in the framework to actually put the code in that will allow the tests to work. I’ll add that as another post.
Hopefully this made sense and is actually of use to someone. In future posts I will try to cover more details and provide additional insights as I continue down this new road myself.
Now we are seeing web applications and sites utilising Bootstrap or emulating these layouts, it’s becoming more of a pain to identify a specific element by class when using FindElement(By.ClassName()).
I recently found out that WebDriver doesn’t support Compound Classes when searching By.ClassName.
In order to get around this, you’ll need to search by CssSelector instead.
Here’s an example:
You can include compound class names selectors by leaving no gap between any of them.
For example if your div is:
<div class="k-calendar-container k-popup k-group k-reset"></div>
then your selector will be:
driver.FindElement(By.CssSelector("k-calendar-container.k-popup.k-group.k-reset"));
This is something I wish i’d had a while ago.
I found this blog post:
Here’s the info from the page so I have a backup copy in case that blog post above ever gets deleted
HowTo: Add all controls on a page to the UI Map
One of the most frequent asks in Coded UI Test Forums is the ability to add all controls on a page to the UI Map. This can be done with the following code snippet. Here I am adding all controls on the bing start page to the specified ui test file.
[TestMethod]
public void CodedUITestMethod1()
{
    string uiTestFileName = @"D:\dev11\ConsoleApplication1\TestProject1\UIMap.uitest";
    UITest uiTest = UITest.Create(uiTestFileName);
    Microsoft.VisualStudio.TestTools.UITest.Common.UIMap.UIMap newMap = new Microsoft.VisualStudio.TestTools.UITest.Common.UIMap.UIMap();
    newMap.Id = "UIMap";
    uiTest.Maps.Add(newMap);
    GetAllChildren(BrowserWindow.Launch(new Uri("http://bing.com")), uiTest.Maps[0]);
             uiTest.Save(uiTestFileName);
}

private void GetAllChildren(UITestControl uiTestControl, Microsoft.VisualStudio.TestTools.UITest.Common.UIMap.UIMap map)
        {
         foreach (UITestControl child in uiTestControl.GetChildren())
            {
                map.AddUIObject((IUITechnologyElement)child.GetProperty(UITestControl.PropertyNames.UITechnologyElement));
                GetAllChildren(child, map);
            }
        }
Let us look at what the code snippet does.
This line of code creates a UITest object from a file. Here I am assuming that we have an empty UITest file. You can add an empty UI Test file to your Test Project by right clicking on the Test Project and choosing Add –> New Item –> Coded UI Test Map.
UITest uiTest = UITest.Create(uiTestFileName);
These next 3 lines create a new UIMap object and adds it to UITest object
Microsoft.VisualStudio.TestTools.UITest.Common.UIMap.UIMap newMap = new Microsoft.VisualStudio.TestTools.UITest.Common.UIMap.UIMap();
newMap.Id = "UIMap";
uiTest.Maps.Add(newMap);
The next line launches the browser, navigates to bing.com and passes a reference to the browser & the UIMap object to GetAllChildren method. GetAllChildren recursively gets the children of the browser object and adds them to the UIMap.
GetAllChildren(BrowserWindow.Launch(new Uri("http://bing.com")), uiTest.Maps[0];);
In the interests of brevity and ease of description, I have not handled error & exception conditions. You can now customize the code based on your need. Instead of GetChildren, you can use FindMatchingControls to add all controls of a specific type.
Hopefully this will help others out there.
Be warned though, it can take a fair bit of time to gather all the controls on the page. So using FindMatchingControls might help as you really don’t need it to gather every single control on a page.
After several attempts at getting this started, I’ve finally got a working character creation in place.
I don’t know if my method to get it working is “the right way” to do it, but everyone needs to start somewhere right?
I decided to use the Settings to store my character details (Stats, Level, Hitpoints, etc). This made it easy for me to create the character and then save the details. Here’s a screenshot of how it looks right now:
-
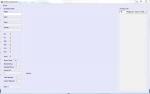
- Main Game Screen using group boxes to layout the info displayed
-
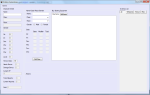
- Character Creation after selecting New Game from the Game Menu
-
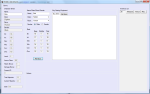
- Character creation after rolling stats
As you can see, I went with group boxes to display all of my relevant data.
The inventory system isn’t currently functioning. I’m working on that right now. Hoping to have it all implemented by the end of next week (depending on how much time i get to sit down and do stuff). I decided to try and allow the user to decide what equipment they wanted to start with, hopefully I haven’t bitten off more than I can chew for my first project. My problem is working out how to get a working inventory and then a working shop. Since I need a place to store items before I create a shop to buy them from. I’m guessing the way to go is to use a List<>, but never having worked with this before, means figuring out how it works and how I can use it to do what I want it to do. If anyone has any suggestions/tips/tricks/pitfalls to avoid then please by all means post them in the comments.
In the character creation usercontrol, I added some validation checks to ensure that the user had filled in their name, selected a class, etc. Since the stats use a race modifier to create a total, the roll dice button will not generate the stats until all other options have been set.
Once the rolls have been made, it sends those over to the Default.Settings and displays them immediately in the character sheet on the left most group box section. It also calculates the amount of hitpoints and starting money, etc.
All in all, given the time I get to spend on this (usually a few hours a week at most), I’m quite happy with the outcome of my character creation so far. I’m sure there are many ways to make it better, but for now I would like to get a working game going. Then I can begin to find ways to optimise it so it functions even better and runs much more efficiently. Having already restarted this project several times over, I’m not adverse to having to start over from scratch again if I have to. I find the coding a lot of fun and as I learn new ways to do things, I enjoy implementing those new things and seeing the end result work the way I want it to.
In my work as a QA Engineer and especially in my current job, I’ve found I need to do a lot of verifying of data in our database.
So I decided to start working on a C# app that will help that process and speed things up for me. At first I began experimenting with creating TableAdapter queries. But I quickly realised I was boxed in with those. Or perhaps it’s simply my inexperience with them that hinders me more? I wanted to create a form where I could use the input in a set of text boxes as parameters to add to a query for a table. I became stuck quickly. Each new query created a new control which was great, but none of these queries would work with the others. So I turned to something that seems to be very popular, LINQ.
My first foray into the land of LINQ has been successful enough that I want to learn more about it now. It definitely looks like it has the power to do what I want it to do. And it has a cool name to boot, always reminds me of the old SNES game… Legend of Zelda: A Link to the Past (still a great game even among the games around today).
As I learn more about it, I’ll post up some code snippets if i remember to do so 🙂
It was definitely much easier to get going with than I expected and was really simple to output my data onto an empty datagrid control. Which makes me happy, as the less time i have to spend writing the application, the more time I can spend using it and being productive.
Currently still in the design phase of creating my game.
Got most of the classes fleshed out with fields now and created class diagrams for the different elements of the game.
I decided to take a break from the class designing and start work on the actual GUI itself. My previous attempt I used a SplitPanel container to work inside of. This sat over the main form. However, I wanted to work out how to embed my UserControl files directly into the main form without needing any containers.
After a little help from Google, I figured it out.
Here’s the basic code:
UserControl ob = new UserControl();
this.Controls.Add(ob);
I wanted to implement this into a menu item. So when the user clicks “New Game” from the File menu, it adds the user control to the form:
private void newGameToolStripMenuItem_Click(object sender, EventArgs e)
 {
 //Start New Game from menu
 //Add user control RollNewCharacter.cs to the form to start the Character Creator
 RollNewCharacter rollchar = new RollNewCharacter();
 this.Controls.Add(rollchar);
 }
However, there’s a pitfall I’ve found. If you have a menu strip docked at the top of your main form, then you need to adjust the user control file to prevent it from being covered over by the menu. I’d like to find a way for it to show properly without needing to alter the actual layout of the user control itself. However, I may end up just creating a container to display the items inside of like I had in my previous design.
So I’ve decided I want to write some games in C# to see just how much I’ve learnt and find the areas I need to work on the most with coding.
Where to start? That’s my biggest hurdle. Initially I find myself just jumping in and coding things. Then I realise I’ve made some mistakes and need to rework some code and redesign things. Clearly this isn’t efficient and ends up with me scrapping the project and starting over.
So this time around I think I need to spend time discovering what things I need to do to design and layout my program before I put fingers to keyboard and start writing code. As with everything I do in C#, this is something I will learn myself and try to gather resources to learn from and understand the basics of design and then move on to more advanced design concepts, etc.
One thing I do know is I need to design class diagrams to work off of. That’s a big thing I don’t do right now. So I’m off to read more about how to lay those out on paper.
As I go through the process I will try to document the design side and share some of the pitfalls and solutions to my problems I discover along the way both in the design stage and coding stage
Had a lot going on at work of late, and have been unable to keep up with posts here.
However, I feel this one deserved some attention, as the more i write about it, the more I can remember how it all works.
A lot of people will say not to use ad-hoc queries in c# applications. Yet, for QA testing, i think they’re useful. Do you really want to ask your DBA to write you a boat load of SP’s? Not the best use of a DBA’s time really.
So just a quick one to start with. Layout of SQL. Thankfully with QA tests, most SQL statements will usually be pretty short and sweet. But in case one gets created that’s longer than expected, it can get pretty messy keeping it all on one line.
So here’s what you do to resolve that…
As long as you use the @ syntax then you can have the SQL span multiple lines just fine.
For example
string sql = @"select
                 colA,
                 colB,
                 colC
               from
                 tableX
               inner join tableY
               on tableX.colA = tableY.colA
               where
                 colB > 20;"
